This is part 3 of the 3 part blog series to help you start to apply Kanban in your environment. Click here for part 1 or here for part 2.
In part 1 of this blog series, I guided you through visualising your workflow and considering what makes you “fit for purpose” in your customer’s eyes. Part 2 covered demand and capability, Classes of Service and Kanban System Design. In this post we’ll explore the design further, as well as how to set Work In Process (WIP) limits.
The Kanban board is a key element of a Kanban system, as that’s how we visualise our Work In Process. The columns or work stages on a Kanban board are largely dependent on your workflow, so you should already have a good idea of the columns you might need. I want to spend some time in this post exploring an often overlooked part of designing a Kanban System - ticket design.
Ticket Design
I’m using the word “ticket” loosely here, but essentially they’re the cards, tasks, or User Stories used to tell us what work needs to be done. Regardless of whether you’re using a physical board or electronic tool, you need to have enough information to allow you to decide when to pull work into our workflow. At the same time, adding too much information is time consuming, and can be overwhelming or wasteful. So how do we decide on the right amount of information to add to a ticket?
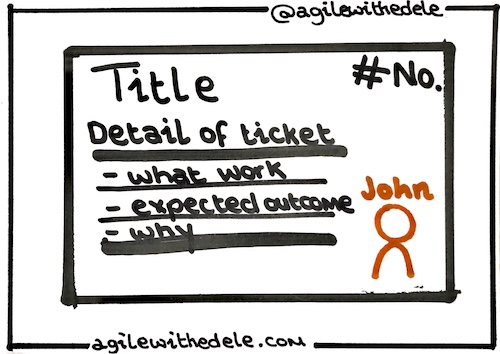
Here are the elements I consider “must-haves”:
- Ticket number - a unique identifier for the ticket
- Title - a descriptive title for what is to be developed
- Description - the detail of the ticket. This should be specific as to what the outcome of this work should be. For example, this could be a User Story, or simply detailing a bug a user is facing along with steps on how to reproduce that bug
- Person/Avatar - to represent who is actively working on that ticket. Note: I don’t agree with assigning work to individuals before it is being worked on, as I believe this goes against the self-organising nature of Agile and Lean.
Additional elements to consider for your cards are:
- Ticket colour - using different colours for categorising work items or grouping work together can help us easily identify all related tickets, with the added bonus that it can help us with reporting!
- Decorators (shape and colour)
- Letter - this can be used to visualise priority, e.g. ‘H’ for High, ‘M’ for Medium - you could even have these letters as a different colour.
- Dates - for example, what date the ticket was started and completed, when the card is due or any other important dates related to this ticket
- Checkboxes - for example, you could list risks and dependencies on the ticket
- Age - showing how many days the work has been in progress for. A lot of electronic tools can show this by default, or for physical tickets, you can simply add a pen mark to the ticket every day at the Daily Meeting (similar to the Daily Scrum)
- Deadline or Target Date - for example, if you need to upgrade a system that has an End-Of-Life (EOL) date, you could add this to the Kanban card.

Alright, that’s all well and good, but how does it actually look in practice? Well, we use Trello here when working on Agile with Edele:
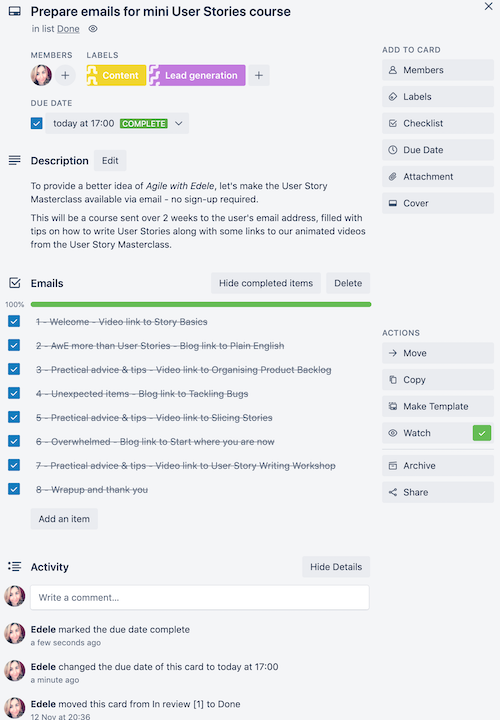
As you can see from the above screenshot, we’re using many of the elements I mentioned above.
- It’s got a fairly descriptive title, I can easily tell what the card is for without opening it.
- My avatar shows that I was working on this card. Trello has the added benefit of allowing you to add multiple avatars, which is handy if you’re pairing with someone on a task
- Some labels with descriptions and different colours to allow me to group them easily
- A due date for when I wanted to have this work completed by
- A description for what I was trying to do and why
- A checklist of elements that were included in this task, in this case a number of emails
Another great thing about Trello is that it automatically tracks the activity of the card. I use this to track cycle and lead time, which I can then use for identifying our flow efficiency.
Setting WIP Limits
One of the core principles in Kanban is to limit the amount of Work In Process (WIP). This helps to keep the team focussed, and encourages everyone to finish what they started before picking up new work. Kanban boards use WIP limits on the different columns or work stages to keep work flowing.
Teams that are new to Kanban and pulling work from right to left based on customer demand often struggle with setting appropriate WIP limits. Most teams start with having a maximum number of items allowed in a column - of course, this is a soft limit and occassionally you will exceed that limit. Although there’s no perfect formula for setting WIP, there are a number of approaches you can try.
Use existing data to set WIP
Where you’ve already got some kind of process in place, simply use your workflow from part 2 where we annotated the average waiting time vs. active working time. Use this to calculate your Flow Efficiency:
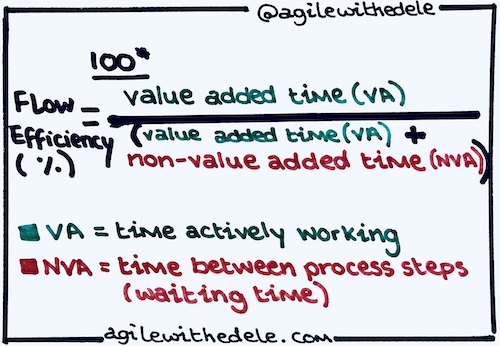
Once you’ve got your Flow Efficiency, divide it by the number of team members to get the total number of work items your task can work on simultaneously. For example, if you have a Flow Efficiency of 60% and a team size of 3, this is 3 ÷ 60%: your team can work on 5 items at once. This is the total WIP for the Kanban board.
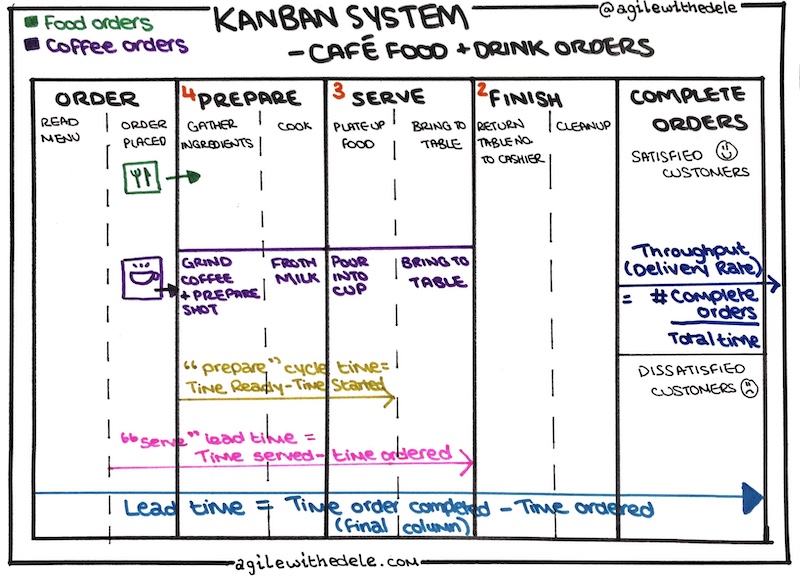
Then you need to divide up the total WIP to the relevant columns. So if our café spends 60% of value added time (VA) for food orders in “preparation”, then 60% of the total WIP should go to that, and so on. Make sure to round any decimals, and you’ve set your initial WIP limits:
- Prepare: 5 tasks * 60% = 3
- Serve: 5 tasks * 20% = 1
- Finish: 5 tasks * 20% = 1
Then we add these values to the relevant columns - these represent our Maximum WIP for that work stage. You would then repeat this for all other processes, for example, the café would repeat this for drinks orders, and either use separate Kanban boards, or where they use the same Kanban board, have separate swimlanes with a total WIP for each column calculated by adding the 2 WIP limits together.
For example, in the table below, the first row represents the WIP we calculated above for the food orders, and the second row is for drinks.
| Order type | Prepare | Serve | Finish |
|---|---|---|---|
| Food orders | 3 | 1 | 1 |
| Drink orders | 1 | 2 | 1 |
| Total WIP for column | 4 | 3 | 2 |
The total WIPs for each column can be shown in red in the figure below:
If you don’t already have some data regarding how long a work item spends in a particular state, there’s a couple of alternative methods you can use to calculate WIP:
Set WIP based on current work in process
This approach is good if you’re already using a task board and don’t need to change any of the columns. Here, you set the maximum limit based on current work in process by counting the number of tickets within each column and use that as your WIP.
Set WIP based on people
This is a people-based approach depending on how many people in the team work on tickets. For example, if you have a team of 4 and you know that each person could work on a maximum of 3 work items, you would have a WIP of 12 (4 people * 3 tasks) for the entire board. Then divide this by the number of columns you have and how much activity happens in each column - for example, if the majority of the work is done “in development” you probably want that column to have a higher WIP than “in review.”
If your team isn’t cross-functional yet, you might have some people who can’t pick up every task or work item. An example could be where you have content writers embedded in the same team as developers. In this case, it’s a good idea to use swimlanes, horizontal rows that represent these different responsibilities or roles, and set individual WIP limits on these swimlanes. If you only have one person doing all the content writing, they can probably only handle 1-2 tasks at any one time, so the “content” swimlane would have a maximum WIP limit of 2. Try to avoid this approach where you want to have a cross-functional team: it’s better to use column based WIP limits to encourage people to pair up and learn from each other.
Set WIP based on Classes of Service
I spoke about the various Classes of Service in the second part of this blog series. It’s a good idea to have at least two swimlanes on your board - one for “standard” work items, and another for “expedited” items that need to be worked on immediately. Setting a WIP limit of 1 for the expedite lane allows the team to focus on that urgent item, and also communicates to stakeholders that you can only accept one urgent task at a time. You can of course set WIP limits for the other swimlanes you have, but I prefer to use a hybrid approach - column based WIP limits for standard, fixed date and intangible work items, and a WIP limit of 1 for the expedite swimlane.
Final steps to get started with Kanban
Whichever approach you use to set WIP, try to avoid the temptation of surpassing your WIP limit just this once - this will result in an “illusion of flow” rather than solving the problem that is causing the bottleneck. If you find that you’re regularly exceeding your WIP limits, you should investigate why, and consider increasing the WIP slightly to compensate. Regardless, it’s important to review WIP limits regularly - if you haven’t surpassed them even once after a few weeks of setting them, they may be too high!
It’s also important to track lead time - the time from creation to completion of a work item - over a period of time. If you tweak a WIP limit, you should also see your lead time change - for example, increasing the WIP limit of a column that often had bottlenecks should result in a faster delivery rate, if this doesn’t happen you should investigate what’s really happening on the board to see if there are other bottlenecks or issues outside the immediate team.
Once you’re using your Kanban board, have set your initial WIP limits, and are regularly reviewing these based on how work is really progressing across your Kanban System you should already be identifying ways to improve. The next steps involve the various meetings you should be running - we call these cadences in Kanban - and thinking about rolling Kanban out to other teams and departments in your organisation.
Wrap-up
If you’ve read every post in this “Getting Started with Kanban” blog series - congratulations, you’ve just learned STATIK (Systems Thinking Approach To Introducing Kanban). I didn’t tell you this term before now as I like to use as little jargon as possible when teaching Agile and Lean - in my view it’s much more important to understand the practices and be able to apply them. I hope you’ve found this series useful and have learned some things that you can take forward into your day-to-day working life. I’d love to hear your feedback, suggestions and questions, feel free to reach out to me at edele@agilewithedele.com.