This is part 2 of the 3 part blog series to help you start to apply Kanban in your environment. Click here for part 1 or here for part 3.
Continuing on from the previous Getting Started with Kanban post, once you’ve visualised your workflow and defined your fitness for purpose, the next step in the Kanban Method is to analyse demand. This means knowing with certainty the answers to:
- Who are your customers and what are they asking for?
- When are they ordering? How long is the average waiting time at different parts of the day?
You should already know how to answer the first question from defining your fitness for purpose - if what your customers want from your service doesn’t match exactly what you provide, you need to figure out how to change. You can either decide to focus on your actual users, or identify your ideal customers and work to acquire them. Once you’ve made that decision, it’s time to get some answers:
- Why are your current customers choosing you over your competitors?
- What would make them shop elsewhere?
You can get these answers in a couple of ways: analysing their habits and patterns, and by asking them directly. For example, you could send out a survey with some key questions, or you could get your sales and customer support teams involved in asking during their interactions with customers and keeping track of those answers over time. You should also analyse more easily available data - for example if there are more orders during different time periods throughout the day, you can easily identify what capability you need to have in order to serve those customers.
The following figure shows the difference between demand and capability, to help you understand why it’s important to have these two elements balanced:
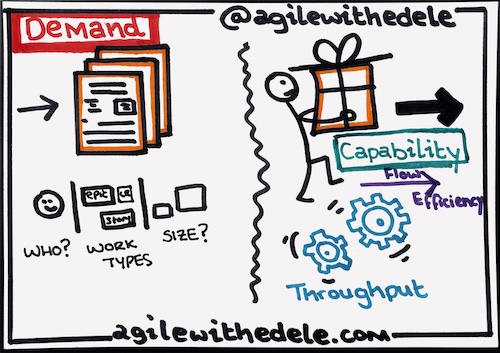
| Demand | Capability |
|---|---|
| How work arrives | How work leaves |
| From whom? | Throughput (Delivery Rate) |
| Types of work | Flow Efficiency |
| What size is the work? | Predictability |
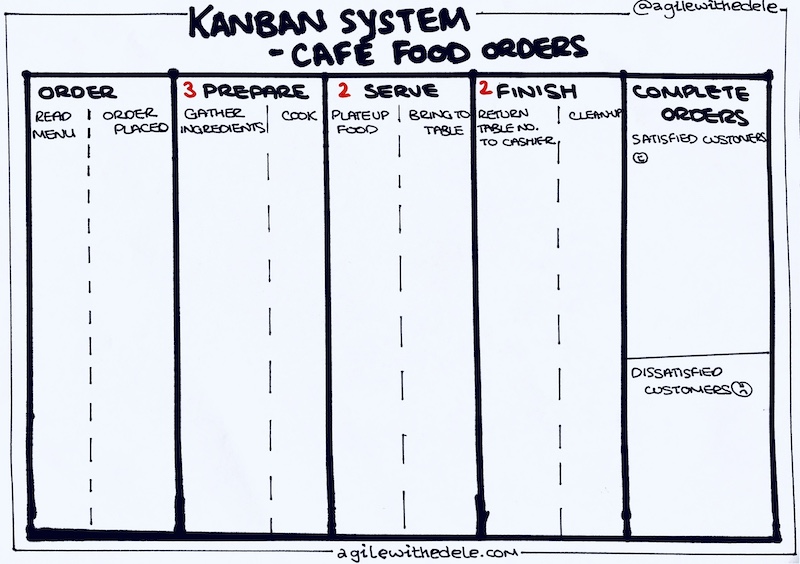
Once you’ve got some data, you can annotate this on your workflow. Again the best way to do this is to map it out. For example, at different steps of the process, annotate the average waiting time vs. active working time. You can also validate the workflow with the orders currently in progress - do they fit cleanly within the columns or is there some overlap? Coming back to the café example from the previous article, if food and coffee orders are on the same card, this would “pollute” the workflow:
It’s probably best to deal with food and coffee orders as slightly separate workflows - you likely don’t have the same people working in the kitchen as you do preparing coffees - they may have had different training and it would be wasteful to have a chef preparing your cappuccinos. A good way to distinguish these two workflows on your Kanban board is to use a swimlane, or horizontal row. For example, in the figure below, the purple horizontal line separates the food orders workflow from the coffee orders:
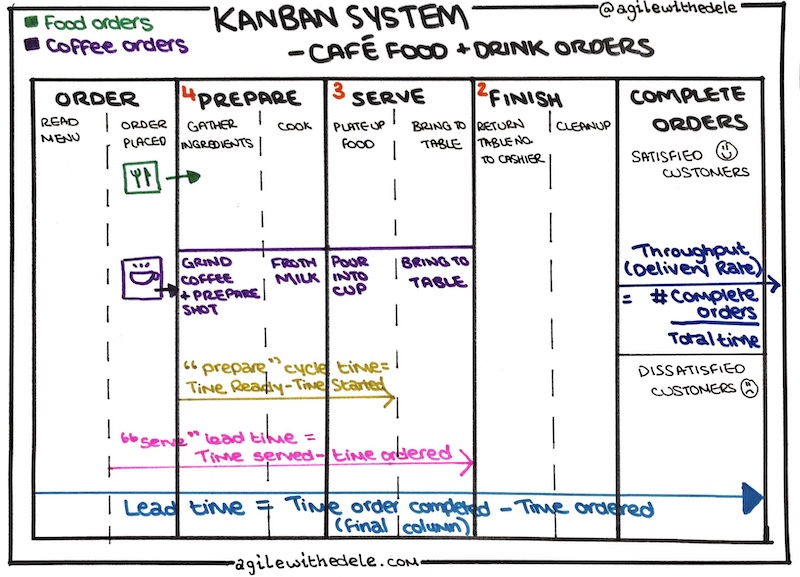
Demand and capability should compliment each other - they need to be balanced to ensure your customer needs are met with minimum waste in your process. I’ve annotated the diagram above with some metrics you should be recording, but you should also annotate the average time a single work item spends in each column, and try to split that into active working vs. waiting time. This can make it super transparent where the inefficiencies in your process lie, i.e. where you’re likely to be losing customers and/or profit as a result of these inefficiencies.
Different customers, different expectations
Following on from this, you also should consider the expectations of the customers who place different types of orders. For example, it’s generally expected that someone ordering food is prepared to wait a little longer than someone who just orders a coffee. In addition, you need to deal with dissatisfied customers who send their orders back, and you may also take pre-orders for lunch if there’s a lot of offices nearby.
These different “order types” are known as “Classes of Service” in Kanban. There are 4 different Classes of Service you can use in a Kanban System:
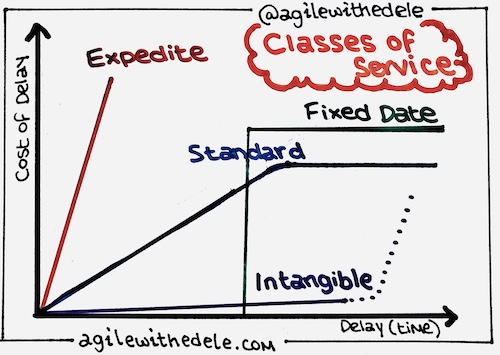
- Expedite: Item which must be delivered as soon as possible, otherwise we will have (or are already having) major losses! Customers sending orders back can be considered an expedite - you don’t want to lose the customer, so you should try to satisfy their needs asap.
- Fixed date: Items which, if not delivered by a certain date, no longer need to be delivered. Lunch pre-orders can be considered fixed date items - if a customer places a pre-order for 1pm but it’s not ready until 3pm, they’ll probably have eaten somewhere else!
- Standard: Ordinary items we deal with every day, where there is no special expectation regarding delivery, i.e. standard food and coffee orders in the café. The majority of your work items should fall under this class.
- Intangible: Items with no foreseeable financial return or impact after delivery, but which if successful can be an important differential for the organisation. This could be used for experiments, for example the café offering a stamp program where if a customer orders 10 coffees over time, they get one free.
Once you have understood and documented how you’ll handle the different Classes of Service for your process, you can work this into your Kanban System.
Design the Kanban System
The next step is the fun part - designing the Kanban System, which is essentially the board. This is a crucial step that is often skipped for the standard Kanban board with 3 columns which isn’t optimised for your process! If you haven’t gone through all the previous steps, you probably don’t fully understand your customers or their behaviours.
You need to consider a number of key elements within a Kanban System:
- What work item types you have - food orders, coffee orders, change requests (e.g. customer ordered soup, but now wants a burger)
- Workflow states - what process steps you have and who is involved in each step (e.g. preparing food orders vs. serving them)
- Work in Process (WIP) limits & queue replenishment policies - this is based on the number of people working at any given time, their skills, and when work is pulled into the next process step (e.g. you can’t serve food when it isn’t fully cooked yet!)
- Think about the Classes of Service, as mentioned above. On top of this, it’s also important to consider how you will deal with sources of variability: disruptions to planned work, commitments, and WIP - for example if a team member gets sick, how does that affect what we deliver to different types of customer?
- Commitment points - e.g. when the kitchen staff are ready to start on an order vs. when waiting staff are ready to deliver it.
- Feedback Mechanisms - the final part of designing your Kanban System is identifying opportunities for different types of feedback? For example, how and when do customers provide feedback on what has been released? When do the team provide feedback on the progress of work and anything that might be impeding that? When do you review metrics and quality?
- Metrics and reporting - identifying what you want to measure, and how often you will review these metrics. At the very least, you should be measuring:
- Cycle time: average time it takes to finish one unit of work
- Lead time: total time it takes from receiving an order to delivering an item
- Delivery rate (throughput): we can use Little’s Law to calculate our throughput
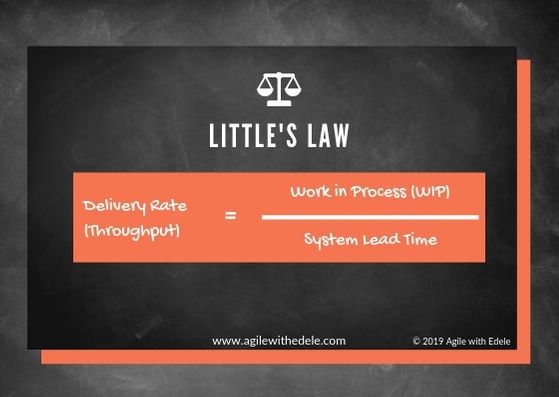
Little's Law - Calculation for Throughput
Replenishment and Release frequencies
Another important aspect to consider is how often work finds its way onto your board, and how you release it. These are known as your Replenishment and Release frequencies, and they should be collectively agreed by the Kanban team as a whole, and well-documented. They’re often referred to as the Definition of Ready and Definition of Done. The former refers to when we pull work from the Product Backlog into the Development Flow. In a café, orders tend to be acted on almost immediately after the customer places it, but there are certain cases like with pre-orders, or non-value adding activities like checking the temperatures of the fridges, or cleaning the floor, that could be placed on a backlog and pulled in when there’s not many customers around.
Release frequencies refers to how often you’re going to release to production and to real users and stakeholders. Again, in a café, this is pretty clear, but maybe during spikes in food orders, you optimise waiting staff to deliver multiple orders at once rather than one at a time. As Kanban doesn’t have time-boxed iterations like sprints in Scrum, it’s up to the team to decide when to release. There’s generally 3 ways to do this:
- Release on a schedule (e.g. every 2 weeks). This approach tends to be used by teams who have previously applied Scrum and are still relatively new to Kanban.
- Release each work item when it has progressed through all states of the board. This is often referred to as “continuous flow” and can be used when work items are independent from others, i.e. deploying a single work item to production does not depend on another work item still being developed. This approach tends to be used in support and bug tracking teams, but is used less in teams developing new features and functionality.
- Release features when ready. This method is quite often used by feature development teams, where after the work item has been deployed to staging, it’ll be moved to a “Ready for release” column until the other work items needed for that feature also end up in that column. This allows for all work items to undergo integration tests before it ends up on production, and follows the idea that every feature should add value to the customer, thus you should be able to release every feature independently.
When you’re ready, check out part 3 of this “Getting Started with Kanban” series where we’ll discuss another important aspect of Kanban Systems Design: how to design your tickets and set sensible WIP limits.