Interaction maps are a useful way to visualise the key dependencies that affect the work of your team. Often people within the team are aware of some of the key dependencies but mapping them out into one big diagram really helps to identify where the key communications and blockers lie. In doing so, you can focus on which interactions are absolutely fundamental to the team being able to deliver and essentially, to do their job, and which ones are secondary to this.
For creating an interaction map, it’s useful to have already have clearly defined roles and responsibilities within the team. It’s also important for at least one representative from every group within the team to create the interaction map (ideally you’d have the whole team present).
This tutorial is based on Step 5 of the ‘Roles and Responsibilities play’ from the Atlassian Playbook. This step can be run independently from the rest of the play. For my teams, I found that 20mins wasn’t enough to form the interaction map for the first time so I recommend at least 40 mins for teams where you have 7 or more key roles.
Running the workshop
Gather materials - flip chart paper and marker pens and prepare the room as you would for any workshop.
Gather around the flipchart. You want the team to identify the interactions, so ensure that there’s enough space and everyone has the opportunity to write on the flipchart.
Start by writing down each of the distinct roles you have within the team, circling them and leaving plenty of space between them. Don’t worry if you don’t write down every single role at first - that’s the beauty of this exercise is uncovering the less known interactions.

Interaction map - start with the primary roles Start to connect the circles by drawing arrows between them. The arrow head should be in the direction of the interaction, label the arrow with the type of support that is needed (for example Product Manager needs to talk to stakeholders to find out requirements).
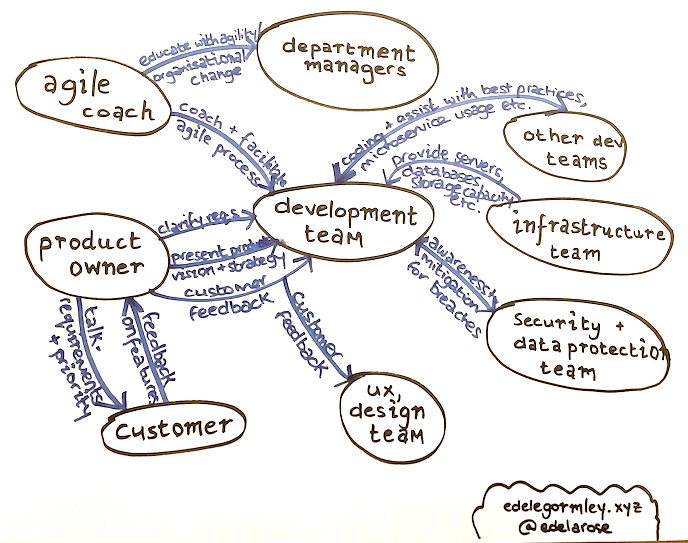
Add in labelled arrows in to show the main interactions Once the team feels most of the key interactions have been drawn, use a different coloured marker to draw over the arrows for the interactions that you feel are most important. In the picture below the key channels are represented by the green arrows. You might think that all the interactions are important - try to focus on those which would reduce or even stop work from being delivered.
Now take another colour of pen (I used red) and draw over those arrows where you feel the interaction doesn’t work the way you think it should at the moment. These are areas to address (if your team has a Scrum Master this could be something for them to focus on improving).
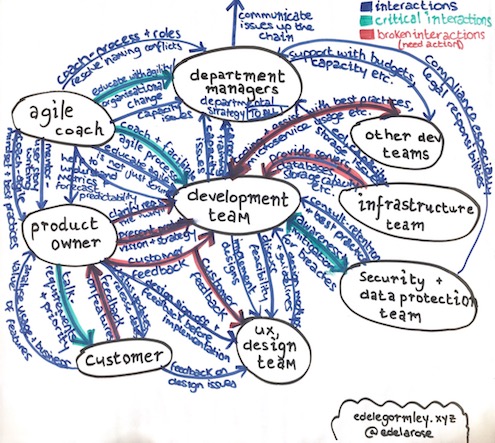
Work out the interactions that are key to the team's work and those that currently cause the team the most 'pain' Now take a step back and admire what you’ve created. Are there any interactions that don’t make sense? Are there any you feel that should be present but for whatever reason don’t currently happen? Annotate them onto the flipchart paper (it helps to use yet another colour), and assign actions to see who can start to improve such relationships (it may be you need to approach another team).
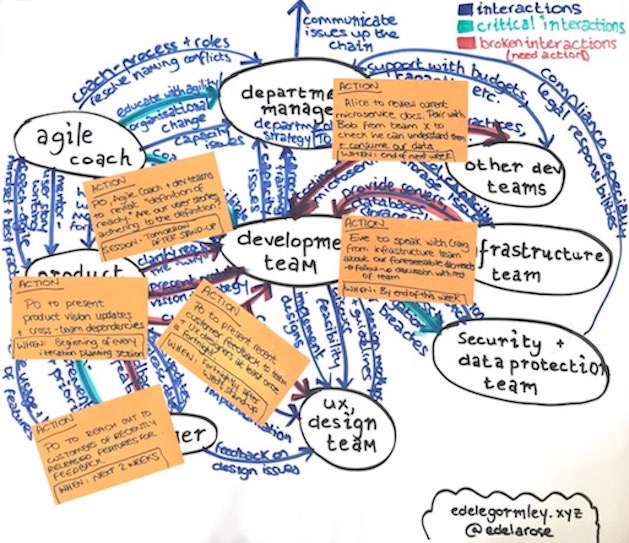
Add in action items to address the most problematic interactions After the workshop your flip chart is probably going to look a little messy. That’s fine, but you might want to tidy it up a little (I like to use draw.io) to make it a little clearer to read.
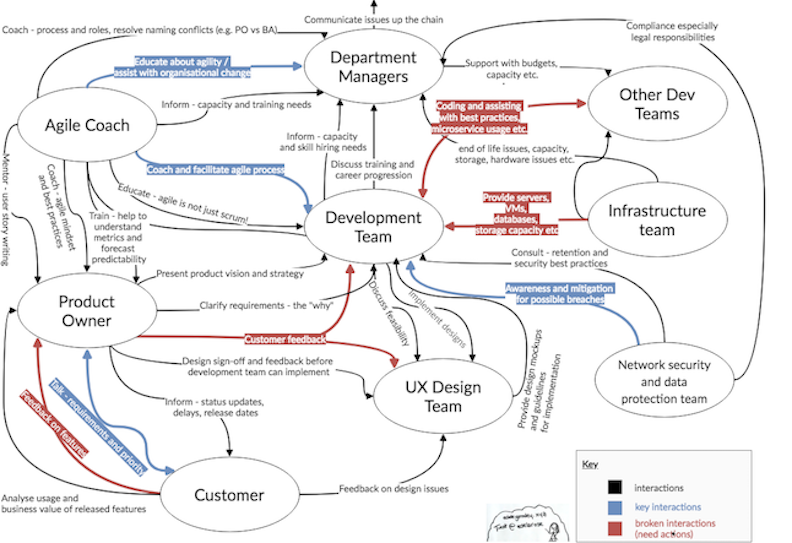
Clean up the diagram *(if you want to)*
That’s it, start with the actions you’ve identified for the most critical routes and hopefully this will reduce the ‘pain’ the team feels for common inter-team dependencies and blockers.